Beyond the Flop Overbet: Elite-Level Turn Play Explained (Part 1)
The flop overbet c-bet is a highly advanced strategy that only a small number of players have implemented, and even fewer are executing it optimally (meaning they’re using the correct range composition and applying the overbet on the right boards).
However, for the purposes of this article, I’ll assume you’re already familiar with that and will move on to explaining the intricacies of playing the turn after such a flop strategy has been employed.
Before diving into the actual weeds of strategy, let me briefly offer a high-level overview of why learning to play beyond the flop is so important.
Turn strategy is just as important as flop strategy. The reason for that lies in how expected value (EV) is actually generated across the game tree.
While it may seem like expected value is created locally within a given node, and that it flows progressively from preflop to flop to turn to river, that couldn’t be further from the truth. In other words, your turn and river strategies heavily influence the EV of each flop option.
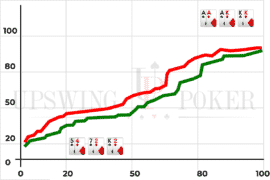
In reality, EV is generated on the river and flows backward (pun intended) toward preflop. Here’s a visual representation of this:

This is a paradigm-shifting insight. The river is the most important street in the game: it contains the largest number of nodes, the highest average pot size, and is the least studied part of the game—making it the hardest to play accurately.
If you want to learn more about this topic, here’s an article I wrote where I explain it in more detail.
Now let’s dive into the actual poker strategy for the turn!
You Made the Overbet on the Flop, Now What?
The first thing you should understand about this situation is that after your opponent calls your very large flop bet, their range becomes heavily filtered toward higher equity hands.
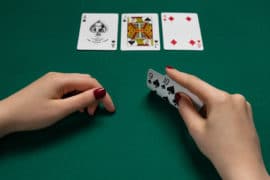
Take a look at how an optimal calling range looks versus a flop overbet from the Button against the Big Blind on an As Ks 8h flop:

If you look closely at this simulation, you’ll notice that weaker top pairs (especially those without a backdoor flush draw) start folding. Second pairs without a backdoor flush draw always fold, lower pairs without a flush draw fold, and even gutshots with a backdoor flush draw sometimes fold.
Another clear pattern in the defending range is that two pair and set combos are frequently check-calling.
Keep this in mind as we examine what the optimal strategy looks like across three strategically distinct turn cards over the course of this article series:
- Td
- 5s
- 6d
How to Play on the Td Turn
A key point in this node is that the Td turn completes the QJ straight.
Both you and your opponent will have a similar number of QJ combos in your ranges—roughly 5%—which levels the playing field. This makes overbetting suboptimal, as it would push your opponent toward too many strong hands. You’d be running into two pair or better too often, and missing value from hands that are nearly drawing dead, like [A9], [A8], [A7], etc.
Even hands like [AQ] and [AJ]—which are strong enough (due to kicker strength and redraw potential) and vulnerable enough (to low flush draws, [JT], [QT], or Kx with weak kickers)—don’t want to overbet. These hands benefit more from a value bet size that keeps worse hands in.
With a clear value betting range in mind ([2P+] and [AJ+]), it’s time to think about which hands make the most sense as bluffs.
To conceptualize this correctly, we need to go back to the fundamentals:
- Range composition
- Blockers
- Equity
- Minimum defense frequency
Let’s start with the most common category of bluffs: draws.
Your Strongest Bluffs: The Combo Draws
The strongest of the bunch are the combo draws. These hands have an enormous amount of equity—not just decent equity, but nut equity.
This makes them excellent candidates for double-barrel bluffing. That said, due to the narrow range composition in this spot, some of them will actually prefer checking back. Let me unpack why.
By using a very large flop size, you’ve pushed your opponent’s range toward higher equity hands. That also means their range is now much narrower. And the narrower the range, the more blocker effects matter. Here’s an easy way to think about it: blocking 1 combo out of a 10-combo range increases your fold equity by 10%, while blocking 1 combo out of a 30-combo range increases your fold equity by only 3.33%.
While some of your combo draws have excellent blockers—like Qx and Jx, which block both the made straight and similar combo draws in the Big Blind’s range—others don’t block as effectively. These weaker combo draws may block less of the continuing range (i.e., they unblock the strongest draws) and may even block more of the folding range, such as the lowest flush draws like 7s 5s, 7s 4s, 6s 4s, and 6s 3s.
Open-End Straight Draws and Flush Draws
The next tier of bluffs includes the open-ended straight draws and the flush draws.
Among the open-enders, there are two distinct tiers based on blocker strength.
The higher-tier hands—such as Js 9s and Js 7s—block the made straight (Qs Jx) and occasionally block combo draws as well. These are strong candidates for barreling. On the other hand, lower-tier hands like 9s 7s don’t block any of the key continues and instead unblock many of them. You’ll prefer bluffing more frequently with the top-tier open-enders, while the bottom-tier ones often perform better as checks.
As for flush draws, you’re mostly stuck with one unexciting tier: hands like 7s 5s, 6s 5s, and 5s 4s. These draws block too much of the Big Blind’s folding range—namely, 7x, 6x, and 5x of spades—which makes them poor bluffing candidates despite having solid raw equity.
Gutshots: The Best and the Worst
The next tier of “natural” draws are the gutshots, which can also be divided into two categories: good blockers (like [Q9], [Q4s], [J6s], etc.) and poor blockers (like [96s] and [76s]).
The strong blocker gutshots work well because they block parts of the raising range, block some of the calling range, and don’t interfere much with the folding range. A standout example is Qs 9x, which blocks the Qs Xs combo draws—hands that both check-raise and check-call—making it an exceptional bluffing candidate. These hands should be fired very frequently, if not always.
The weaker tier—hands like [96s] and [76s]—don’t block the raising range at all, barely block the calling range, and disproportionately block the folding range. These should generally just check back.

Merge Bluffs: Blocking and Barreling Equity
The next interesting class of bluffs are your merge hands. These thrive in narrow range compositions due to their blocker effects. Think hands like [QTs], [JTs], [T9], [T7s], [T6s], [Q8s], [J8s], etc.
Since your opponent’s range is already quite narrow—about 109 combos compared to 151 if they had faced a 75% pot c-bet on the flop—and they frequently flat with hands like [A8], [K8], and [88] rather than raising, blocking an 8x becomes very valuable in terms of extra fold equity.
The same logic applies to hands like [QT] and [JT]. Blocking both two-pair combos and the straight is a huge advantage. Some of these hands even block combo draws, giving them additional bluffing strength.
And importantly, these hands retain equity when called—often improving to two pair, trips, or a straight. Plus, when the river completes a four-straight, these hands become immensely profitable either as triple-barrel bluffs or as nutted value bets.
No Pair, No Draw
The final category of hands that can be rationally considered for bluffing are the unpaired, no-draw hands—which, on this board, are very limited. We’re talking about hands like 7h 5h, 6d 5d, and 5c 4c.
The blocker effects for these hands are quite interesting. Because of the high-card nature of the flop, the Big Blind doesn’t have many 7x, 6x, 5x, or 4x combos without a spade. That’s a direct result of our very large flop sizing, which forces hands like pocket pairs without a spade to fold.
As a result, these hands carry strong anti-blocker properties: they unblock the folding range effectively. However, this doesn’t apply to the heart versions, which block Kx of hearts—hands that often fall into the Big Blind’s check-fold range. Since these low hands are drawing dead anyway, checking doesn’t accomplish much. That’s why the optimal strategy is to bluff with the club and diamond versions at least some of the time.
While this might look like an insane strategy, it’s actually part of a deeply thought-out system designed to ensure you have sneaky bluffs even on the most draw-completing rivers. Identifying and deploying these bluffs puts you in an elite tier of strategic mastery.
Here’s a snapshot of the strategy taken from Lucid Poker:

Wrapping Up
This article was highly advanced, so if your brain is hurting a little and you feel overwhelmed by the depth of the analysis—that’s completely normal. What you’re experiencing is your brain signaling that neuroplasticity is needed. It’s already starting to reshape itself. Give it time. Review the material again tomorrow, and maybe revisit it a week from now to really cement the concepts.
I hope you enjoyed reading this article as much as I enjoyed writing it. If you have any questions or feedback, feel free to leave a comment below and I’ll do my best to respond!
See you in Part 2 of the series, where we’ll break down how to approach a spade-completing turn.
Till next time, good luck, grinders!
To learn more about how to play in advanced strategy nodes, read: How To Play Straight Turns After Check-Raising the Flop.